Indoor Cycling Bike Setup: Prevent Joint Injuries at Singapore Spin Studios

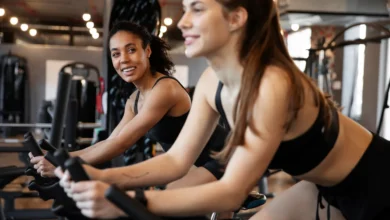
Walk into any spin studio in Singapore on a busy evening and you will see a familiar scene. Riders adjusting their bikes quickly before class, often guessing at settings, often getting them wrong. Some will finish the session with a dull ache in their knees. Others will feel a familiar tightness in their lower back that they have learned to accept as part of the experience. A few will quietly wonder why their hips click when they pedal. Most will attribute these discomforts to the intensity of the workout and assume they will pass.
In many cases, they will not pass. They will worsen gradually and almost imperceptibly until they become chronic injuries that require physiotherapy, extended rest, and in some cases, a period of complete training absence. The frustrating truth is that the vast majority of these injuries are entirely preventable, and the prevention begins before the first pedal stroke, at the moment of bike setup.
Indoor cycling Singapore attracts thousands of participants each week across studios island-wide, and proper bike setup education remains one of the most overlooked aspects of onboarding new and even returning members. This article is a detailed, biomechanics-grounded guide to getting your setup right so that your spin class builds your body rather than quietly breaking it down.
Why So Many Regular Spin Class Attendees Develop Chronic Pain
The human body is remarkably good at adapting to mechanical stress, but it adapts to the stress it actually experiences, not the stress you intend to apply. When your bike is set up incorrectly, every pedal stroke reinforces a suboptimal movement pattern. In a forty-five minute class with a cadence of eighty revolutions per minute, you are performing somewhere in the region of three thousand to four thousand pedal strokes. Multiply that by three sessions per week over several months, and you begin to understand how small biomechanical errors accumulate into significant joint damage.
The most commonly affected joints are the knees, which bear the brunt of saddle height and fore-aft positioning errors. The lower back and hip flexors are frequently compromised by handlebar height that is too low or saddle height that is too high. The neck and shoulders suffer when the torso is forced into a compromised position by handlebar placement that does not suit the rider’s arm length and flexibility.
None of these injuries announce themselves loudly at first. They whisper. A slight stiffness here, a minor ache that resolves by the next day. Over time, the whisper becomes a persistent conversation, and eventually a shout that is impossible to ignore.
The Five Bike Setup Variables That Determine Everything
There are five adjustable variables on a standard spin studio bike, and each one interacts with the others. Getting all five right requires understanding not just each variable in isolation, but how they work together to create a position that is biomechanically sound for your specific body proportions.
Saddle height is the most critical variable and the one that most directly affects knee health. When the saddle is too low, the knee is forced into excessive flexion at the bottom of each pedal stroke, compressing the patellofemoral joint and creating the anterior knee pain that is extremely common among spin class attendees. When the saddle is too high, the hip drops to one side at the bottom of the pedal stroke in a motion called hip hiking, which stresses the iliotibial band, the hip flexors, and the lateral knee structures.
The correct saddle height places the knee at a bend of approximately twenty-five to thirty-five degrees at the bottom of the pedal stroke. A practical starting point is to set the saddle at hip height when standing beside the bike, then refine from there based on the feel of the first few minutes of pedalling.
Fore-aft saddle position determines how far forward or backward the saddle sits on the seat post. This variable controls the knee’s position relative to the pedal axle at the three o’clock position in the pedal stroke, which is the point of maximum mechanical load. The standard reference point is to position the front of the knee cap directly above the pedal axle when the crank arm is horizontal. When the saddle is too far forward, the knee tracks excessively over the toe, creating patellar tendon stress. When it is too far back, the hamstrings are overloaded and the lower back bears more strain.
Handlebar height is the variable most directly linked to lower back and neck discomfort. Many riders, particularly those new to spin classes or those with limited hamstring and hip flexor flexibility, instinctively lower the handlebars to mimic a road cycling position they have seen in images. This creates a forward lean that the lower back and hip flexors must sustain for the entire duration of the session, which for most people who lack the specific flexibility and core strength developed through years of road cycling training, results in significant lumbar strain.
For the majority of recreational spin class participants in Singapore, setting the handlebars at or slightly above saddle height creates a more upright torso position that is sustainable, safe, and still effective for generating power and cardiovascular effort.
Fore-aft handlebar position, which is available on some but not all spin bikes, determines reach. A reach that is too long forces the shoulders to round and the neck to crane upward to see the instructor, creating cervical spine stress. A reach that is too short crowds the torso and makes efficient breathing harder. The correct reach allows the elbows to have a slight bend when the hands are on the bars, with the shoulders relaxed and away from the ears.
Foot placement and cleat positioning, for bikes with clipless pedal systems, determines how the foot interfaces with the pedal throughout the stroke. The ball of the foot should sit directly over the pedal axle. When the foot is positioned too far forward or backward on the pedal, the ankle joint is forced to work in a compromised range of motion across every pedal stroke, which over time creates stress on the Achilles tendon, plantar fascia, and ankle joint itself.
The Mechanics of a Healthy Pedal Stroke
Beyond static bike setup, the quality of the pedal stroke itself has significant biomechanical implications. A common error among spin class beginners is what is called mashing, which involves applying force only on the downstroke and allowing the foot to go essentially passive on the upstroke. This creates an uneven load distribution that concentrates stress on the quadriceps and knee joint.
A biomechanically sound pedal stroke applies force throughout the full rotation. Think of scraping mud off the bottom of your shoe at the bottom of the stroke and pulling your foot up and over at the top. This engagement of the hamstrings and hip flexors on the upstroke distributes the mechanical work across more muscle groups and reduces the per-stroke load on the knee joint significantly.
Instructors in technique-focused classes specifically work on developing this full-circle pedal stroke, which is one reason why beginning with a foundational class before progressing to maximum-intensity formats is so valuable for long-term joint health.
Warning Signs Your Setup Is Wrong
Your body will communicate bike setup errors clearly if you know how to listen. Anterior knee pain during or after class almost always indicates that the saddle is too low or too far forward. Pain or tightness at the back of the knee suggests the saddle is too high. Persistent lower back ache during class points to handlebars that are too low or a reach that is too long. Neck and shoulder tension typically indicates the same. Hip clicking or snapping is often related to saddle height or fore-aft positioning errors that cause the hip to move through an unnatural range of motion with each pedal stroke. Foot numbness suggests the foot is positioned too far forward on the pedal, compressing the metatarsal joints against the pedal platform.
None of these signals should be ignored or pushed through. They are the body’s early warning system and responding to them early, with a setup correction, prevents the minor discomfort of today from becoming the chronic injury of six months from now.
How TFX’s Technique-Focused Classes Support Joint Longevity
The I.C.E. class format at TFX Singapore is specifically designed to build a solid foundation in bike setup and cycling technique before intensity is layered in. This approach is unusual in a market where many spin studios prioritise the high-energy entertainment aspect of group cycling over the technical foundation that makes that intensity safe and sustainable.
Starting with a technique-focused class, even if you are an experienced gym-goer or outdoor cyclist, is genuinely worthwhile. The biomechanical demands of stationary indoor cycling are meaningfully different from outdoor riding, and assumptions carried over from outdoor experience or other gym equipment do not always translate safely to the spin bike environment.
FAQ
My knees ache after spin class. Is this because of the intensity or my bike setup?
In the majority of cases, knee pain after spin class is related to bike setup rather than intensity alone. The most common causes are a saddle that is too low, creating excessive knee flexion, or a saddle that is positioned too far forward, pushing the knee excessively over the toe. Before assuming you simply need to ease off the intensity, have an instructor check your setup and make adjustments. The difference is often immediate and significant.
How long does it take to find a correct and comfortable cycling position?
Most people can find a workable baseline setup in a single session with attentive guidance. Refining that position to an optimal level typically takes two to four sessions as you develop a clearer sense of how different adjustments feel during actual riding. Keeping a note of your settings once you find what works saves you from resetting from scratch at every class.
Should I ask the instructor to check my setup at every session or just once?
Once you have found a reliable setup, you do not need to have it rechecked every session. However, if you are returning after a break, switching between different bikes in the studio, or noticing any new discomfort, it is absolutely worth asking an instructor to take a look. Minor drift in saddle position over time, or differences between bikes of the same model, can reintroduce setup errors that you had previously corrected.
Can people with pre-existing knee conditions do spin classes safely?
Many people with knee conditions including mild osteoarthritis, patellar tracking issues, and previous ligament injuries find that indoor cycling, when properly set up, is one of the most joint-friendly forms of exercise available. The low-impact nature of the pedalling motion, without the ground reaction forces of running, makes it genuinely accessible for compromised knees. The critical factor is correct bike setup and an honest approach to resistance selection that does not place the knee under excessive strain during early sessions.
What is a simple way to check saddle height without a measuring tape?
Stand beside the bike and set the saddle to the height of your hip bone, which is the prominent bony point at the side of your waist. This gives you a reliable starting point. Once on the bike, your knee should have a slight bend of around twenty-five to thirty degrees at the bottom of the pedal stroke, with your heel just touching or slightly off the pedal. If your hips are rocking side to side, the saddle is too high. If you feel significant pressure at the front of your knee during the downstroke, the saddle is too low.